It’s an undeniable fact that you can’t hit a checkout until you reach a checkout. How you get from 501 down to a number that can be taken out is not just a matter of scoring as many points as possible until you reach a score of 170 or less. There are pitfalls along the way that must be avoided. Land on the wrong number and you will be forced to waste darts to reestablish a clear path to a double.
The highest score you can take out in three darts is 170, which makes 350 the highest score you can take out in six darts (180-170). So that’s your first goal in 501 – leave a score below 351 that can be taken out in six darts.
You’ll see many mentions below to bogey numbers. What I mean by this is that there are scores that require more darts to finish than would be required by a slightly higher score. Here’s an example:
| Score | Comment | Throw | Leave |
| 439 | 100 leaves a bogey | 99: T20-S20-S19 | 340 |
Starting with 439 and scoring 100 leaves 339. How is this a bogey? I addressed this in detail in a previous post (The Bogey Numbers), but to make a long story short, 339 can not be taken out in six darts whereas 340 can. So you’re better off throwing 99 to leave 340 than 100 to leave 339. Makes sense, right?
Just to be clear, if you start with a score of 439 I’m not suggesting you should throw a 99. By all means, throw a 180 or 140. But if you throw a treble 20 with your first dart and hit the single 20 with your second dart, do not throw the third dart at the treble 20 – throw at the treble 19 and if it lands in the single 19 the resulting 99 leaves you on 340.
The suggested throws are provided to give you an idea of what you’ll need to throw to reach your goal, and to help you avoid the bogeys that will force you to throw more darts. If you can score more points than the suggested throw, and avoid a bogey, by all means do so.
Tip: All bogey numbers (above 50) end in the digits 2, 3, 5, 6, 8, 9 – so, when in doubt, leave a score that ends in 0, 1, 4, or 7.
Let’s look at some starting score ranges to see what you’ll need to throw, and what you’ll need to avoid, to reach a checkout.
501-451
At the start of a leg of 501, you’ll need to hit three big trebles (or two and the bull) to get below 351 and keep your hopes for a 9-darter alive. If you stumble out of the gate with a poor first round, two big trebles are enough to get you back in the race for a 12 dart leg. Unfortunately, there are many minefields for starting scores in this range. Two treble 20’s and a stray outside the 20 – (think: 121, 123, 125, 135) can result in a bogey for many of these starting scores, as can a poorly considered cover shot.
In summary, do your math here and avoid ending the round with a score of 349, 348, 346, 345, 343, 342, or 339, as these scores make it impossible to leave a checkout after the next round.
With most of this range, a score of 140 will get you to your goal, with the exception of a just a few of the scores listed below which will require a bit more finesse to reach a safe number below 351.
| Score | Comment | Throw | Leave |
| 501 | Need 3 big trebles (but not three T18’s) | 180, 177, 174, 171 | 321- 330 |
| 500- 491 | Need 3 big trebles | 180, 177, 174, 171, 170, 168, 165, 162 | |
| 490 | 140 will get you to 350 | 140: 7 20’s | 350 |
| 489 | 140 leaves a bogey S20 1st dart leaves a bogey | 142: T19-T20-25 139: S19-T20-T20 | 347 350 |
| 488 | 140 & 139 leave a bogey S20 or S19 with 1st dart leaves a bogey | 138: S18-T20-T20 | 350 |
| 487 | 140 is good Avoid: 139, 138 | 140: 7 20’s | 347 |
| 486 | Good: 142, 139, 136 Avoid: 140, 138, 137 S20 1st dart leaves a bogey | 142: T19-T20-25 139: S19-T20-T20 136: S19-T19-T20 | 344 347 350 |
| 485 | Good: 138, 135 Avoid: 140, 139, 137, 136 S20 or S19 with 1st dart leaves a bogey | 138: S18-T20-T20 | 347 |
| 484 | Good: 140, 137, 134 Avoid: 139, 138, 136, 135 | 140: 7 20’s 137: T20-S20-T19 134: S20-T19-T19 | 344 347 350 |
| 483 | Good: 142, 139, 136, 133 Avoid: 140 Avoid: 138, 137, 135, 134 S20 1st dart leaves a bogey | 142: T19-T20-25 139: S19-T20-T20 136: S19-T19-T20 133: 7 19’s | 341 344 347 350 |
| 482 | Good: 138, 135, 132 Avoid: 140, 139, 137 Avoid: 136, 134, 133 S20 or S19 with 1st dart leaves a bogey | 138: S18-T20-T20 | 344 |
| 481 | Good: 140, 137, 134, 131 Avoid: 139, 138, 136 Avoid: 135, 133, 132 | 140: 7 20’s 137: T20-S20-T19 134: S20-T19-T19 131: T20-S20-T17 | 341 344 347 350 |
| 480 | Good: 140, 139, 136, 133, 130 Avoid: 138, 137, 135 Avoid: 134, 132, 131 | 140: 7 20’s 139: T20-T20-S19 136: T20-T19-S19 133: 7 19’s | 340 341 344 347 |
| 479 | Good: 142, 139, 138 Good: 135, 132, 129 Avoid: 140, 137, 136 Avoid: 134, 133, 131, 130 S20 1st dart leaves a bogey | 142: T19-T20-25 139: S19-T20-T20 | 337 340 |
| 478- 451 | 140 is good here, but for each of these there are several scores in the 102-139 range that will leave a bogey. Be careful. | 140: 7 20’s | 338- 311 |
Notice for 489, 488, 486, 485, 483, 482, and 479, we’re not throwing the first dart at treble 20. This is because a single 20 will put you on a bogey. For instance, if you score 20 from 489 you’ll be left with 469 from which you can not reach a score with your two remaining darts that can be taken out in the next two rounds. Start on 19’s and if you hit the single, two treble 20’s will take you to 350 for the next round. For 488, 485, and 482, single 19 also puts you on a bogey, so start with 18.
Here are two opportunities to make use of the bull with your third dart:
| Score | Comment | Throw | Leave |
| 455 | 105 leaves a 6 dart checkout | 105: T20-S20-25 | 350 |
| 452 | 105 leaves a 6 dart checkout | 105: T20-S20-25 | 347 |
450-351
Generally speaking, you don’t need to score more than 100 from here to have a chance to leave a checkout after the next round. However, the danger zone mentioned above (349, 348, 346, 345, 343, 342, 339) still must be avoided, as noted in the chart below:
| Score | Comment | Throw | Leave |
| 450 | Good: 100 Avoid: 101, 102, 104, 105 Avoid: 107, 108, 111 | 100: 5 20’s | 350 |
| 449 | 100 leaves a bogey | 99: T20-S20-S19 99: S20-S19-T20 102: S20-T19-25 | 350 350 347 |
| 448 | 100 leaves a bogey | 98: T20-S20-S18 98: S20-S18-T20 | 350 |
| 447 | Good: 100, 97 | 100: 5 20’s 97: S20-S20-T19 | 347 350 |
| 446 | 100 leaves a bogey | 99: T20-S20-S19 99: S20-S19-T20 102: S20-T19-25 | 347 347 344 |
| 445 | 100 leaves a bogey | 98: T20-S20-S18 98: S20-S18-T20 | 347 |
| 444 | Good: 100, 97, 94 | 100: 5 20’s 97: S20-S20-T19 94: S20-S20-T18 | 344 347 350 |
| 443 | 100 leaves a bogey | 99: T20-S20-S19 99: S20-S19-T20 102: S20-T19-25 | 344 344 341 |
| 442 | 100 leaves a bogey | 98: T20-S20-S18 98: S20-S18-T20 | 344 |
| 441 | Good: 100, 97, 94, 91 | 100: 5 20’s 97: S20-S20-T19 94: S20-S20-T18 91: S20-S20-T17 | 341 344 347 350 |
| 440 | Good: 100, 99, 96 | 100: 5 20’s 99: T20-S20-S19 96: S20-T19-S19 | 340 341 344 |
| 439 | 100 leaves a bogey | 99: T20-S20-S19 99: S20-S19-T20 102: S20-T19-25 | 340 340 337 |
| 438- 416, 414, 413, 411 | 100 leaves a 6 dart checkout. Beware of scores just below 100 that may leave a bogey | 100: 5 20’s | 338- 316, 314, 313, 311 |
| 415 | 65 leaves a 6 dart checkout | 65: S20-S20-25 | 350 |
| 412 | 65 leaves a 6 dart checkout | 65: S20-S20-25 | 347 |
| 410 | 60 leaves a 6 dart checkout. | 60: 3 20’s | 350 |
| 409 | 60 leaves a bogey | 59: S20-S20-S19 | 350 |
| 408 | 60 leaves a bogey | 58: S20-S20-S18 | 350 |
| 407 | 60 leaves a 6 dart checkout. | 60: 3 20’s | 347 |
| 406 | 60 leaves a bogey | 59: S20-S20-S19 | 347 |
| 405 | 60 leaves a bogey | 58: S20-S20-S18 | 347 |
| 404 | 60 leaves a 6 dart checkout. | 60: 3 20’s | 344 |
| 403 | 60 leaves a bogey | 59: S20-S20-S19 | 344 |
| 402 | 60 leaves a bogey | 58: S20-S20-S18 | 344 |
| 401 | 60 leaves a 6 dart checkout. | 60: 3 20’s | 341 |
| 400 | 60 or more will leave you on a 6 dart checkout. (Other than 61. Don’t throw 61.) | 60: 3 20’s 100: 5 20’s 140: 7 20’s 180: 9 20’s | 340 300 260 220 |
| 399 | 60 leaves a bogey | 59: S20-S20-S19 | 340 |
| 398- 351 | 60 or more will leave you on a 6 dart checkout. | 60: 3 20’s 100: 5 20’s 140: 7 20’s 180: 9 20’s | 338-291 298-251 258-211 218-171 |
As mentioned previously, the advice here isn’t to throw a 58 from 408. The suggestion is that if your first two attempts at treble 20 land in the single 20, throw the third dart at the 18’s.
If you look the last row above, you will see that scores of 60-180 will all leave you on a 6 dart checkout. There are no bogeys in this range, so score as much as you can. The more you can score from here the easier it will be to leave a good checkout after the next round.
350-291
At the top of this range you’ll need three big trebles to reach a score of 170 or less (avoiding the bogey numbers 169, 168, 166, 165, 163, 162, 159). A score of 140 is sufficient at the bottom of the range.
| Score | Comment | Throw | Leave |
| 350, 347, 344, 341 | 180 leaves a checkout | 180: T20-T20-T20 | 170- 161 |
| 349, 348, 346, 345, 343, 342, 339 | Bogey numbers. Can’t reach a checkout with three darts. | Don’t ask me. I told you not to land on these numbers. | |
| 340 | Only 180 or 170 will do | 180: T20-T20-T20 170: T20-T20-Bull | 160 170 |
338 337 336, 333 335, 332 334 331 330 | Need 3 big trebles 180, 177, 174, 171 180, 177, 170 180 180, 177, 174, 171 180, 177, 174, 170 180, 177, 174, 171 180, 177, 174, 170 | 180: T20-T20-T20 177: T20-T20-T19 174: T20-T20-T18 171: T19-T19-T19 171: T20-T19-T18 170: T20-T20-Bull | |
| 329-316 | 140 is not enough – need 3 big trebles | 180, 177, 174, 171 | |
| 315 | 140 is not enough 145 leaves a checkout | 145: T20-T20-25 | 170 |
| 314, 313 | 140 is not enough – need 3 big trebles | 180, 177, 174, 171 | |
| 312 | 140 is not enough 145 leaves a checkout | 145: T20-T20-25 | 167 |
| 311 | 140 is not enough – need 3 big trebles | 180, 177, 174, 171 | |
| 310 | 140 leaves a checkout | 140: 7 20’s | 170 |
| 309 | 139 or 142 leaves a checkout Throw 1st dart at 19’s | 142: T19-T20-25 139: S19-T20-T20 | 167 170 |
| 308 | 138 leaves a checkout Throw 1st dart at 18 | 138: S18-T20-T20 | 170 |
| 307 | 140 leaves a checkout | 140: 7 20’s | 167 |
| 306 | 140 is no good Throw first dart at 19’s 136, 139, 142 leave a checkout | 142: T19-T19-25 136: T19-S19-T20 139: S19-T20-T20 | 164 170 167 |
| 305 | 140 is no good S20 or S19 1st dart is no good 135, 138, 145 leave a checkout | 145: 25-T20-T20 138: 18-T20-T20 135: 15-T20-T20 | 170 167 160 |
| 304 | 140 leaves 164 Avoid: 135, 136, 138, 139 | 140: 7 20’s | 164 |
| 303 | 140 is no good Throw first dart at 19’s 133, 136, 139 leave a checkout | 133: 7 19’s 136: T19-S19-T20 139: S19-T20-T20 | 170 167 164 |
| 302 | 140 is no good Throw first dart at 18’s 132, 135, 138 leave a checkout | 132: T18-S18-T20 135: S18-T19-T20 138: S18-T20-T20 | 170 167 164 |
| 301 | 140 leaves a checkout | 140: 7 20’s | 161 |
| 300 | 140 leaves a checkout | 140: 7 20’s | 160 |
| 299 | 140 is no good Throw first dart at 19’s 129, 135, 139 leave a checkout | 129: T19-T18-S18 135: T19-S18-T20 139: S19-T20-T20 | 170 164 160 |
| 298 | 140 leaves a checkout Avoid: 139, 136, 135 Avoid: 133, 132, 130, 129 | 140: 7 20’s | 158 |
| 297 | 140 leaves a checkout Avoid: 138, 135, 134 Avoid: 132, 131, 129, 128 | 140: 7 20’s | 157 |
| 296 | 140 leaves a checkout Avoid: 137, 134, 133 Avoid: 131, 130, 128, 127 | 140: 7 20’s | 156 |
| 295 | 140 leaves a checkout Avoid: 136, 133, 132 Avoid: 130, 129, 127, 126 | 140: 7 20’s | 155 |
| 294 | 140 leaves a checkout Avoid: 135, 132, 131 Avoid: 129, 128, 126, 125 | 140: 7 20’s | 154 |
| 293 | 140 leaves a checkout Avoid: 134, 131, 130 Avoid: 128, 127, 125, 124 | 140: 7 20’s | 153 |
| 292 | 140 leaves a checkout Avoid: 133, 130, 129 Avoid: 127, 126, 124, 123 | 140: 7 20’s | 152 |
| 291 | 140 leaves a checkout Avoid: 132, 129, 128, Avoid: 126, 125, 123, 122 | 140: 7 20’s | 151 |
Notice for 309, 308, 306, 305, 303, 302, and 299, we’re not throwing the first dart at treble 20. This is because a single 20 will put you on a bogey. For instance, if you score 20 from 309 you’ll be left with 289 from which you can not reach a checkout with your two remaining darts. Start on 19’s and if you hit the single, two treble 20’s will take you to 170 for the next round. For 308, 305, 302 a single 19 is also a bogey, so start with 18.
290-231
A score of 140 is good at the top of this range, scores around 100 will work in the middle and 60 is not quite enough at the bottom of the range. A big score could leave you with a two dart checkout.
Bogey numbers to avoid: 169, 168, 166, 165, 163, 162, 159
| Score | Comment | Throw | Leave |
| 290-276 | Need two big trebles. 140 is good. Beware of bogeys for scores of 107-131 | 140: 7 20’s | 150- 136 |
| 275 | 100 is not enough 105 leaves a checkout | 105: 4 20’s + 25 | 170 |
| 274 | 100 is not enough 104 leaves a checkout | 104: T20-S19-25 | 170 |
| 273 | 100 is not enough 103 leaves a checkout | 103: T20-S18-25 | 170 |
| 272 | 100 is not enough 105 leaves a checkout | 105: 4 20’s + 25 | 167 |
| 271 | 100 is not enough 101 or 104 leaves a checkout | 101: T19-S19-25 104: S19-T20-25 | 170 167 |
| 270 | 100 leaves a checkout | 100: 5 20’s | 170 |
| 269 | 100 is no good 99 or 102 leaves a checkout | 102: T19-S20-25 99: S19-T20-20 | 167 170 |
| 268 | 100 is no good 98 leaves a checkout | 98: T18-S19-25 98: S18-T20-S20 | 170 |
| 267 | 100 leaves a checkout | 100: 5 20’s | 167 |
| 266 | 100 is no good 96 or 99 leaves a checkout | 96: T19-S19-S20 99: S19-T20-S20 | 170 167 |
| 265 | 100 is no good 95 or 98 leaves a checkout | 95: 5 19’s 98: S19-S19-T20 | 170 167 |
| 264 | 100 leaves a checkout | 100: 5 20’s | 164 |
| 263 | 100 is no good 96 or 99 leaves a checkout | 99: T20-S20-S19 96: S20-T19-S19 | 164 167 |
| 262 | 100 is no good 95 or 98 leaves a checkout | 95: 5 19’s 98: S19-S19-T20 | 167 164 |
| 261 | 100 leaves a checkout | 100: 5 20’s | 161 |
| 260 | 100 leaves a checkout | 100: 5 20’s | 160 |
| 259 | 100 is no good 95 or 99 leaves a checkout | 95: 5 19’s 99: S19-T20-S20 | 164 160 |
| 258-236 | 100 leaves a checkout Beware of scores below 100 that may leave a bogey | 100: 5 20’s | 158- 136 |
| 235 | 60 is not enough 65 will leave a checkout | 65: S20-S20-25 | 170 |
| 234 | 60 is not enough 64 will leave a checkout | 64: S20-S19-25 | 170 |
| 233 | 60 is not enough 63 will leave a checkout | 63: S19-S19-25 | 170 |
| 232 | 60 is not enough 65 will leave a checkout | 65: S20-S20-25 | 167 |
| 231 | 60 is not enough 61 will leave a checkout | 61: S18-S18-25 | 170 |
230-171
At this point you don’t need more than three big singles to leave you on a checkout for the next round, but one and two dart checkouts can be reached with a big score.
Bogey numbers to avoid: 169, 168, 166, 165, 163, 162, 159
| Score | Comment | Throw | Leave |
| 230 | 60 leaves a checkout. Don’t throw a cover shot after two 20’s | 60: 3 20’s | 170 |
| 229 | 60 leaves a bogey so move to 19’s after two single 20’s | 59: S20-S20-S19 | 170 |
| 228 | 60 leaves a bogey so move to 18’s after two single 20’s | 58: S20-S20-S18 | 170 |
| 227 | 60 leaves a checkout | 60: 3 20’s 57: S20-S20-S17 57: 3 19’s | 167 170 170 |
| 226 | 60 leaves a bogey so move to 19’s after two single 20’s | 59: S20-S20-S19 | 167 |
| 225 | 60 leaves a bogey so move to 15, 18 or bull after two 20’s | 65: S20-S20-25 58: S20-S20-S18 55: S20-S20-S15 | 160 167 170 |
| 224 | 60 leaves a checkout | 60: 3 20’s 57: S20-S20-S17 57: 3 19’s | 164 167 167 |
| 223 | 60 leaves a bogey so move to 19’s after two single 20’s | 59: S20-S20-S19 | 164 |
| 222 | 60 leaves a bogey so move to 15, 18 or bull after two 20’s | 65: S20-S20-25 58: S20-S20-S18 55: S20-S20-S15 | 157 164 167 |
| 221 | 60 leaves a checkout | 60: 3 20’s 57: S20-S20-S17 57: 3 19’s | 161 164 164 |
| 220 | 60 leaves a checkout | 60: 3 20’s 59: S20-S20-S19 | 160 161 |
| 219 | 60 leaves a bogey so move to 19’s after two single 20’s | 59: S20-S20-S19 | 160 |
| 218- 171 | 60 leaves a checkout | 60: 3 20’s | 158- 111 |
170-159
If you’ve been paying attention, you’re on a checkout – so take it out!
If not, you’re not. Do your best to clean up the mess and take it out next round. If you get a next round.
| Score | Comment | Throw | Leave |
| 170 167 164 161 | Take it out! (With 161, S20-S20-25 gets you below 100) | T20-T20-Bull T20-T19-Bull T19-T19-Bull T20-T17-Bull | |
| 169 | If you’d thrown one less point somewhere along the way, you’d be on a checkout now. | 137: T20-T20-S17 | 32 |
| 168 | If you’d thrown one more point somewhere along the way, you’d be on a checkout now. | 136: T20-T20-S16 | 32 |
| 166 | This is an awful number to leave. You can’t even do something cute with the bull to fix it. What were you thinking? | 134: T20-T20-S14 | 32 |
| 165 | Hello? This isn’t a checkout. 2 20’s and a single bull leaves 100 | 133: 7 19’s 65: S20-S20-25 | 32 100 |
| 163 | 2 20’s and a single bull leaves 98 | 131: T20-T19-S14 65: S20-S20-25 | 32 98 |
| 162 | 2 20’s and a single bull leaves 97 | 130: T20-T20-S10 65: S20-S20-25 | 32 97 |
| 160 | Take it out if you can, but don’t throw a cover shot after two single 20’s – 60 leaves a 2 dart checkout. | T20-T20-D20 | |
| 159 | A) You shouldn’t be here B) Don’t leave 99 | 127: T20-T19-S10 59: S20-S20-S19 | 32 100 |
Tip: Calculate your score remaining after every dart thrown. You’ll make fewer mistakes if you know your exact score before you throw your next dart.
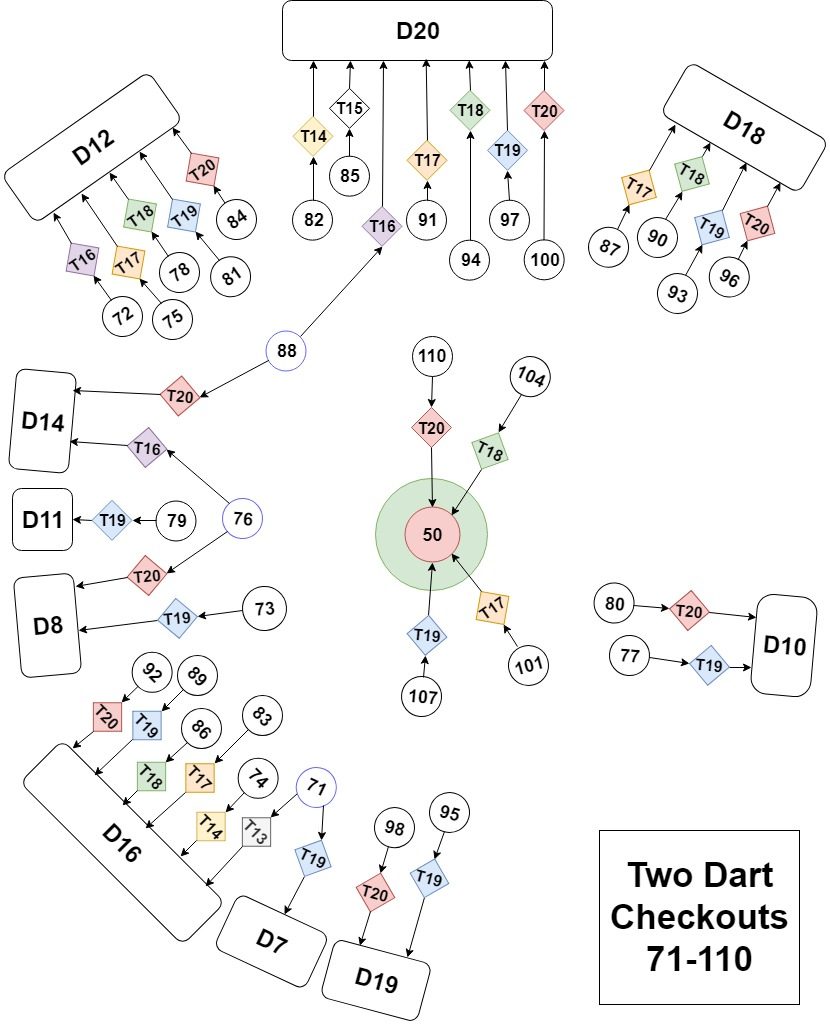
 When working your way down to a checkout, don’t forget the middle of the board. The bullseye offers both the highest Single and the highest Double score on the board.